Introduction
What better way to celebrate Halloween than by whipping up some delectable Halloween chocolate sandwich cookies? These tasty treats are not only a delight for your taste buds, but also an ideal canvas for your creativity.
We will guide you through the steps to make the best Halloween sandwich cookies that will impress your friends and family. We’ve got spooky designs and mouthwatering flavors to suit every taste.
Why you’ll love Halloween Chocolate Sandwich Cookies
Scrumptious Flavor
These cookies combine soft, chocolate chip cookies with a creamy frosting filling. Every bite of these cookies is a taste explosion, thanks to their rich and sweet flavors that perfectly complement the luscious frosting.
Creative Decorating
Creativity is one of the most exciting aspects of these Halloween chocolate sandwich cookies. You can decorate them with orange pumpkins, black bats, or eerie green ghouls. Let your artistic side shine and customize each cookie to your heart’s content.
Halloween Fun
The spirit of Halloween is alive in these cookies. Plus, they’re a hit at Halloween parties and gatherings. Families and friends can enjoy baking, decorating, sharing, and savoring them together. In addition, they’re a big hit at Halloween parties.
Versatile Treats
Halloween Chocolate Sandwich Cookies are versatile treats that cater to a variety of tastes. Sweetness, flavor, and frosting colors can be adjusted to suit your taste and dietary restrictions, making them appealing to a wide range of cookie lovers.
Eye-Catching Presentation
In addition to tasting fantastic, these cookies also look amazing. Displayed on a platter or in a festive box, they create an ambiance conducive to Halloween. Gifting or giving them as a delightful treat for trick-or-treaters is a great idea.
Spooky Tradition
Halloween Chocolate Sandwich Cookies can become a family tradition. You can revisit this recipe year after year, experiment with new designs, and involve your family and friends. It’s a delightful way to celebrate the season.
Perfect Balance
It is a match made in cookie heaven when soft, chewy cookies are combined with sweet, creamy frosting. A harmonious blend of textures and flavors will leave you wanting more after every bite.
Homemade Charm
Your Halloween celebrations will be more personal when you bake these cookies from scratch. Creating treats for your loved ones shows that you put effort and love into it, which makes them even more special.
How to Make Halloween Chocolate Chip Sandwich Cookies
Ingredients
For the Cookies:
- Unsalted butter, softened
- Granulated sugar
- Eggs
- Vanilla extract
- All-purpose flour
- Baking soda
- Salt
- Semi-sweet chocolate chips
For the Frosting:
- Unsalted butter, softened
- Powdered sugar
- Milk
- Vanilla extract
- Gel-based food coloring in Halloween colors (e.g., orange, black, green)
Instructions
For the Cookies:
- Prepare two parchment-lined baking sheets by preheating the oven to 350°F (175°C).
- Combine the softened butter and granulated sugar in a large mixing bowl, and cream until light and fluffy.
- Beat the butter-sugar mixture with the eggs and vanilla extract until well combined.
- In a separate bowl, whisk together the flour, baking soda, and salt.
- Mix the dry ingredients with the wet ingredients until a soft dough forms.
- The semi-sweet chocolate chips should be evenly distributed throughout the dough.
- Drop rounded spoonful of dough onto prepared baking sheets, leaving enough room between each for them to spread.
- Once the oven is preheated, bake the cookies for 10-12 minutes, or until the edges are lightly golden.
- Cool the cookies on the baking sheets for a few minutes before transferring them to wire racks to cool completely.
For the Frosting:
- Mix the softened butter until it is creamy and smooth in a mixing bowl.
- Continue beating until the frosting is fluffy and well combined after adding the powdered sugar, milk, and vanilla extract. If necessary, add more milk to achieve the desired consistency.
- For each Halloween color, divide the frosting into separate bowls. To achieve vibrant shades, use gel-based food coloring.
Assembling the Cookies:
- Make sure your cooled cookies are of similar sizes, and pair them up.
- One cookie should be covered in a generous amount of colored frosting.
- Spread the frosting evenly on another cookie, then sandwich it with another cookie.
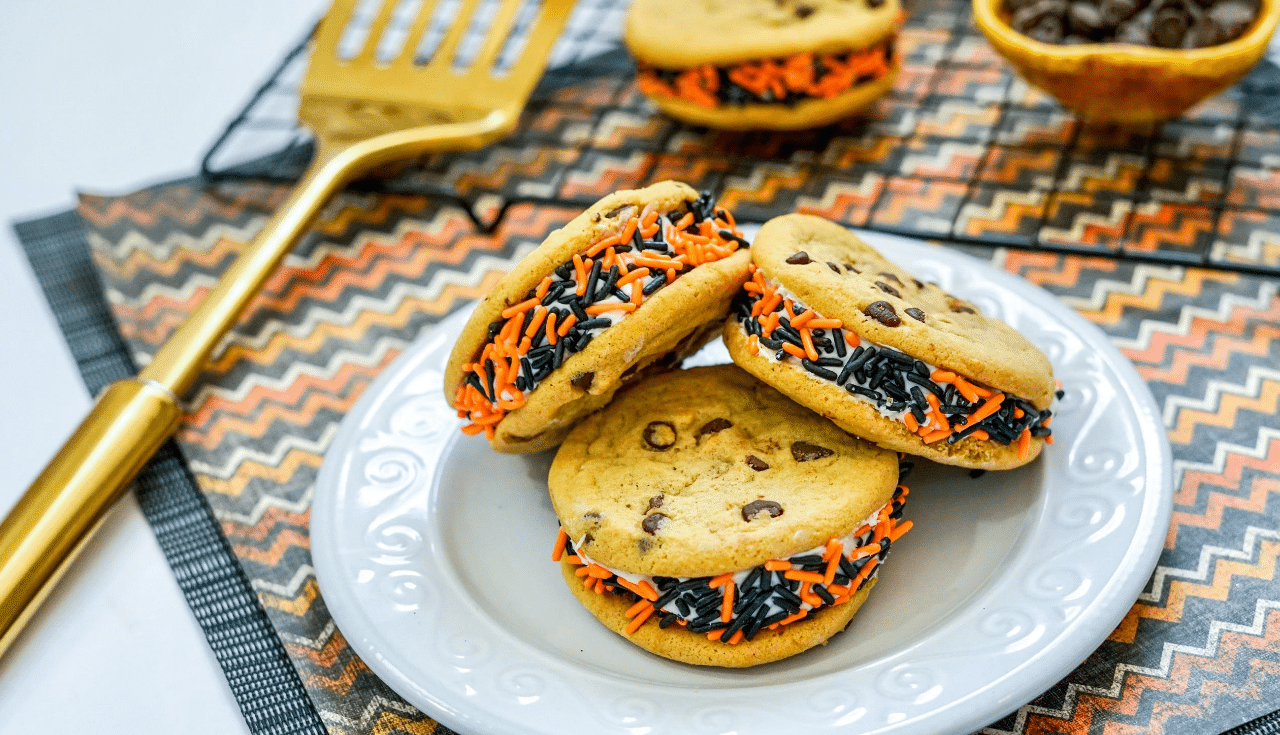
- For an extra festive touch, sprinkle Halloween-themed sprinkles or edible decorations on the frosting.
- Continue making Halloween Chocolate Chip Sandwich Cookies until you have a spooky collection.
Now you have a scrumptious batch of Halloween Chocolate Chip Sandwich Cookies that are perfect for parties, gatherings, or as treats for trick-or-treaters. Enjoy your homemade Halloween delights!
Frosting Time
Now that you have baked and shaped your Halloween cookies, it’s time to add a touch of color and sweetness by preparing the frosting. Follow these steps to create vibrant and Halloween-themed frosting:
Homemade Frosting:
Start with a batch of homemade frosting. You can use a basic buttercream frosting recipe as a foundation.
Halloween Colors:
Divide your frosting into separate bowls, depending on how many Halloween colors you want to use – think orange, black, eerie green, or any other spooky shades you prefer.
Food Coloring:
Add gel-based food coloring to each bowl. Start with a small amount and gradually increase until you achieve the desired intensity of color. Remember, a little goes a long way with gel food coloring.
Mix Thoroughly:
Use a spatula or a hand mixer to thoroughly mix the food coloring into the frosting. Make sure there are no streaks, and the color is evenly distributed.
Taste Test:
Give the frosting a taste test to ensure the flavor and sweetness meet your preferences. You can adjust the sweetness by adding powdered sugar if needed.
Texture Check:
Check the frosting’s consistency. It should be easy to spread but not too runny. If it’s too thick, you can add a teaspoon of milk to thin it out, or if it’s too thin, add more powdered sugar to thicken it.
Tips for Halloween Chocolate Sandwich Cookies
A few tips can help ensure your Halloween sandwich cookies turn out perfectly:
Keep It Chilled
Refrigeration: When you have finished assembling your sandwich cookies with frosting, place them in the refrigerator for a few minutes. Especially if you plan to serve them in warmer weather, this helps set the frosting, preventing it from melting or becoming too soft.
Storage
Airtight Containers: Keep your Halloween sandwich cookies fresh by storing them in airtight containers. By doing so, moisture is prevented from entering and the texture and flavor are maintained. To prevent sticking, layer them with parchment paper.
Experiment
Flavor Variations: Experiment with different flavors of cookies and frosting. The addition of mint chocolate frosting to chocolate chip cookies or lemon zest frosting to sugar cookies can add a unique twist to your Halloween treats.
Involve Kids
Family Fun: Kids will love these Halloween cookies. Decorating is a great way to bond with your children and create lasting memories.
Festive Display: Make your cookies spooky and festive by arranging them in a spooky manner. For a truly ghoulish display, display them on a platter or in a decorative box.
Variations for Halloween Chocolate Sandwich Cookies
Halloween Classic:
Food coloring can be used to tint your frosting orange.
Make pumpkin-inspired cookies by decorating them with black sprinkles or candy eyes.
Midnight Magic:
Frosting in black creates a mysterious look.
Add edible silver or gold stars for a touch of midnight magic.
Wicked Witch:
Go for a vibrant green hue.
Use a toothpick dipped in black food coloring to create spooky witch hat designs in the frosting.
Spider Web Special:
Orange or White Frosting: Either color works well.
Pipe a spider web design using black frosting, and add a chocolate spider in the center for a creepy-crawly effect.
Mummy Mayhem:
White Frosting: Keep it simple with white frosting.
Drizzle thin lines of white frosting in a crisscross pattern to make your cookies look like mummies.
Gory Goodness:
Red Frosting: Create a bloody effect with red frosting.
Add gummy worms or candy “eyeballs” for a gruesome touch.
Haunted House:
Mix a drop of black food coloring into white frosting to create ghostly gray.
Decorate with mini candy ghosts or tiny haunted house-shaped candies.
Vampire’s Delight:
Deep Red Frosting: Achieve a rich, blood-red frosting.
Use white frosting to create fang marks on some of the cookies for a vampire-themed twist.
Monster Mash:
Divide your frosting into different Halloween colors like green, purple, and orange.
Let your creativity run wild by mixing and matching frosting colors on each cookie to create an assortment of playful monsters.
Jack-o’-Lantern Fun:
Orange Frosting: Stick to the classic orange.
Use black frosting to draw Jack-o’-Lantern faces on the cookies, giving each one its personality.
Conclusion
Creating the best Halloween chocolate sandwich cookies isn’t just about taste; it’s also about culinary creativity.
Make these sweet and spooky treats the highlight of your Halloween party. Prepare to impress everyone with your baking skills and spread the Halloween spirit!

Halloween Chocolate Sandwich Cookies Recipe
Ingredients
For the Cookies:
- 1 cup unsalted butter, softened
- 1 cup granulated sugar
- 2 large eggs
- 1 tsp. vanilla extract
- 2 cups all-purpose flour
- 1 tsp. baking soda
- ½ tsp. salt
- ½ cup semi-sweet chocolate chips
For the Frosting:
- ½ cup unsalted butter, softened
- 2 cups powdered sugar
- 3 tbsp. milk
- 1 tsp. vanilla extract
- Gel-based food colors (e.g., orange, black, green)
Instructions
For cookies:
- Prepare two parchment-lined baking sheets by preheating the oven to 350°F (175°C).
- Combine the softened butter and granulated sugar in a large mixing bowl, and cream until light and fluffy.
- Beat the butter-sugar mixture with the eggs and vanilla extract until well combined.
- In a separate bowl, whisk together the flour, baking soda, and salt.
- Mix the dry ingredients with the wet ingredients until a soft dough forms.
- The semi-sweet chocolate chips should be evenly distributed throughout the dough.
- Drop rounded spoonfuls of dough onto prepared baking sheets, leaving enough room between each for them to spread.
- Once the oven is preheated, bake the cookies for 10-12 minutes, or until the edges are lightly golden.
- Cool the cookies on the baking sheets for a few minutes before transferring them to wire racks to cool completely.
For the Frosting:
- Mix the softened butter until it is creamy and smooth in a mixing bowl.
- Continue beating until the frosting is fluffy and well combined after adding the powdered sugar, milk, and vanilla extract. If necessary, add more milk to achieve the desired consistency.
- For each Halloween color, divide the frosting into separate bowls. To achieve vibrant shades, use gel-based food coloring.
Assembling the Cookies:
- Make sure your cooled cookies are of similar sizes, and pair them up.
- One cookie should be covered in a generous amount of colored frosting.
- Spread the frosting evenly on another cookie, then sandwich it between another cookie.
- For an extra festive touch, sprinkle Halloween-themed sprinkles or edible decorations on the frosting.
- Continue making Halloween Chocolate Chip Sandwich Cookies until you have a spooky collection.
- Enjoy! Halloween Chocolate Sandwich Cookies


